
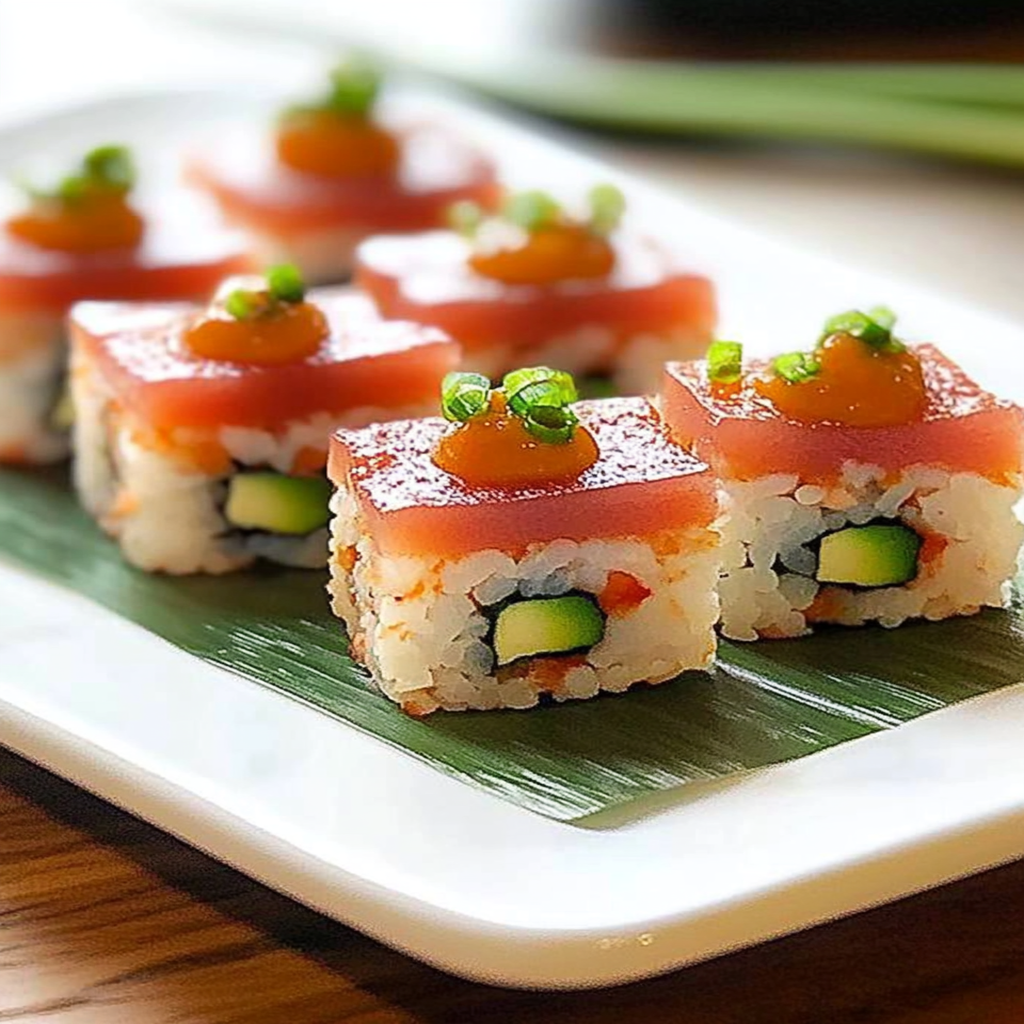
Oshizushi, or pressed sushi, is a delightful dish that combines fresh ingredients with a unique presentation. Imagine layers of vibrant vegetables and glossy fish stacked high, ready to be sliced into perfect little squares that burst with flavor in every bite. zucchini pasta for a fresh twist pairing with creamy feta pasta.
The first time I tasted Oshizushi was at a lively family gathering. My aunt, armed with her trusty wooden mold, transformed simple sushi rice and fresh toppings into a stunning centerpiece. The delight on everyone’s faces as they took their first bite is a memory I cherish. crispy vegan taquitos recipe serving vegan quiche for brunch Perfect for celebrations or simply when you want to impress friends, this dish promises an unforgettable flavor experience.
Why You'll Love This Recipe
- Making Oshizushi is surprisingly easy and requires minimal culinary skills.
- Its layered flavors create a beautiful explosion of taste in every bite.
- The visual appeal of this dish will make it the star of your table.
- Plus, it’s versatile enough to accommodate various ingredients based on your preferences or pantry supplies.
Ingredients for Oshizushi (Pressed Sushi)
Here’s what you’ll need to make this delicious dish:
- Sushi Rice: Use short-grain sushi rice for its sticky texture, which holds the layers together beautifully.
- Rice Vinegar: This adds the essential tang to the rice; opt for seasoned rice vinegar for extra flavor.
- Fresh Fish: Salmon or tuna works best; make sure it’s sushi-grade for safety and taste.
- Vegetables: Choose colorful options like cucumber and avocado for crunch and freshness.
For the Garnish:
- Sesame Seeds: Toasted sesame seeds give an extra crunch and nutty flavor that complements the dish perfectly.
How to Make Oshizushi (Pressed Sushi)
Follow these simple steps to prepare this delicious dish:
Step 1: Prepare the Sushi Rice
Start by rinsing about two cups of sushi rice under cold water until it runs clear. This removes excess starch and ensures a proper texture. Cook it according to package instructions with a bit of salt added for flavor.
Step 2: Season the Rice
Once cooked, transfer the warm rice to a large bowl. Gently fold in half a cup of rice vinegar mixed with two tablespoons of sugar until fully incorporated. Let it cool slightly while you prepare the fillings.
Step 3: Slice Your Fillings
Take your fresh fish and vegetables and slice them into thin strips. Aim for uniformity here; nobody wants a fish slice that looks like it was attacked by a hungry bear!
Step 4: Assemble in the Mold
Using a sushi mold or any rectangular container, layer rice at the bottom followed by your chosen fillings—fish and veggies—then more rice on top. Press down firmly but not too hard; we’re making art here, not concrete!
Step 5: Chill Before Cutting
Cover with plastic wrap and place something heavy on top (like a book) to help compress everything together. Chill in the refrigerator for about 30 minutes; this helps it hold its shape when cut.
Step 6: Serve It Up!
Once chilled, remove from the mold and slice into squares using a sharp knife dipped in water (to prevent sticking). Arrange beautifully on a platter, sprinkle with toasted sesame seeds, and voilà—your stunning Oshizushi is ready to wow your guests!
Transfer to plates and drizzle with soy sauce or serve alongside pickled ginger for that perfect finishing touch. Enjoy your culinary masterpiece!
You Must Know
- This delightful dish of Oshizushi, or Pressed Sushi, transforms simple ingredients into a culinary masterpiece.
- It’s not just sushi; it’s an art form!
- Perfect for impressing guests or enjoying a cozy night in, this vibrant creation will steal the show at any table.
Perfecting the Cooking Process
To achieve sushi perfection, start by preparing your sushi rice first. While it cools, slice your vegetables and fish. Then, layer everything in your oshizushi mold and press away to create those impressive layers!
Add Your Touch
Feel free to get creative! Swap out traditional fish for grilled chicken or tofu for a vegetarian twist. Add some spicy mayo or pickled ginger for an extra flavor kick that will make your taste buds dance!
Storing & Reheating
Store leftover Oshizushi in an airtight container in the fridge for up to two days. To enjoy it again, simply let it sit at room temperature for about 15 minutes before serving—no need to heat!
Chef's Helpful Tips
- Always rinse your sushi rice thoroughly before cooking to remove excess starch and achieve that perfect sticky texture.
- Invest in a good-quality mold to ensure even pressing—trust me, it makes a difference!
- Lastly, experiment with different fillings to discover your favorite flavor combinations.
When I first served Oshizushi at a family gathering, my relatives thought I’d been trained by a sushi master. Little did they know, I was just following my own recipe and winging it like a pro!
FAQs
What is Oshizushi (Pressed Sushi)?
Oshizushi, also known as pressed sushi, is a traditional Japanese dish that involves layering sushi rice and various toppings in a wooden mold called an “oshizushihako.” The ingredients are compressed to create a compact block of sushi, which is then sliced into bite-sized pieces. This method not only enhances the flavors but also creates a visually appealing presentation. While it may seem complex, making Oshizushi at home can be quite straightforward with the right ingredients and techniques.
How do you make Oshizushi at home?
To make Oshizushi at home, start by preparing sushi rice seasoned with vinegar. Next, select your desired toppings, such as fish or vegetables. Layer the rice and toppings in the oshizushihako, packing them tightly. After compressing for about 10-15 minutes, remove from the mold and slice into pieces. Serve with soy sauce or wasabi for added flavor. This method allows you to customize your oshizushi according to personal taste preferences.
What are some popular toppings for Oshizushi?
Popular toppings for Oshizushi include fresh fish like salmon, tuna, or shrimp, as well as vegetables like avocado and cucumber. You can also experiment with pickled ingredients or marinated items to add depth of flavor. The key is to balance the flavors of the toppings with the seasoned rice. Each topping brings its unique taste and texture, making each piece of pressed sushi a delightful experience.
Can you store leftover Oshizushi?
Yes, you can store leftover Oshizushi in an airtight container in the refrigerator for up to two days. However, it’s best enjoyed fresh since the texture of the rice can change when stored. If you notice any moisture or changes in flavor, it’s advisable to discard it. To maintain freshness and taste, consider making smaller batches that can be consumed in one sitting.
Conclusion for Oshizushi (Pressed Sushi)
Oshizushi, or pressed sushi, offers a delightful blend of flavors and textures that can elevate any meal. By using simple ingredients like seasoned rice and your choice of toppings, you can create stunning presentations that impress both family and friends. Remember to experiment with different combinations to find your favorite variations. With practice and creativity, making this traditional Japanese dish at home becomes enjoyable and rewarding. Embrace the art of Oshizushi today!
Oshizushi (Pressed Sushi)

Oshizushi, or pressed sushi, is a delicious and visually stunning dish that layers sushi rice with fresh fish and vibrant vegetables. This Japanese delicacy is perfect for gatherings or intimate dinners, offering a burst of flavor in every bite. Impress your guests with this eye-catching culinary creation that’s surprisingly easy to make!
- Prep Time: 20 minutes
- Cook Time: 20 minutes
- Total Time: 40 minutes
- Yield: Serves approximately four people (16 pieces) 1x
- Category: Appetizer
- Method: Layering
- Cuisine: Japanese
Ingredients
- 2 cups short-grain sushi rice
- 1/2 cup seasoned rice vinegar
- 8 oz sushi-grade salmon or tuna, sliced into thin strips
- 1 cup cucumber, thinly sliced
- 1 ripe avocado, thinly sliced
- 2 tbsp sugar (for seasoning rice)
- Toasted sesame seeds (for garnish)
Instructions
- Rinse sushi rice under cold water until clear. Cook according to package instructions with a pinch of salt.
- Combine warm cooked rice with seasoned rice vinegar and sugar; let cool slightly.
- Layer half of the sushi rice in a mold, followed by layers of fish and vegetables, then top with remaining rice. Press gently.
- Cover with plastic wrap and place something heavy on top. Chill for about 30 minutes.
- Remove from mold and slice into squares using a sharp knife dipped in water. Garnish with toasted sesame seeds before serving.
Nutrition
- Serving Size: 100g
- Calories: 210
- Sugar: 2g
- Sodium: 350mg
- Fat: 6g
- Saturated Fat: 1g
- Unsaturated Fat: 5g
- Trans Fat: 0g
- Carbohydrates: 32g
- Fiber: 3g
- Protein: 10g
- Cholesterol: 25mg