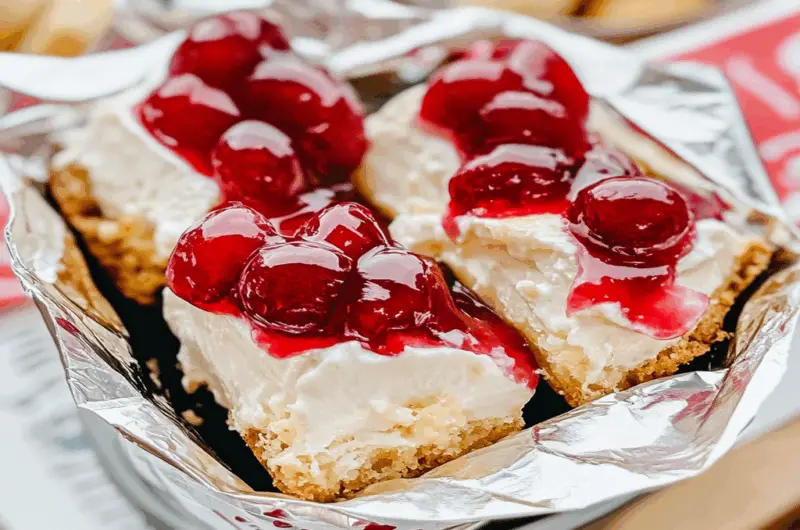
The moment you take a bite of a Walking Cherry Cheesecake, your taste buds will be singing in harmony like a choir of angels who just discovered dessert. Imagine the creamy, dreamy texture of cheesecake paired with the tart sweetness of cherries, all nestled within a delightful crust that’s more satisfying than finding money in your winter coat pockets. This is not just any dessert; this is a showstopper that dances on your palate and makes your heart do happy flips.
Now picture this: it’s a warm summer evening, and you’re sitting outside with friends, laughter flowing as freely as the wine. You pull out these cherry cheesecakes, and suddenly, you’re the culinary superhero of the night. Everyone gathers around, eyes wide in anticipation as they wonder what deliciousness awaits them. Trust me; these little beauties are bound to steal the spotlight at any gathering.
Why You'll Love This Recipe
- The ease of making Walking Cherry Cheesecakes means you can whip them up without breaking a sweat.
- A perfect balance of tangy and sweet flavors creates an unforgettable experience.
- Their stunning look will make your dessert table shine like a diamond.
- Versatile enough to be served at picnics or fancy dinners, they fit any occasion flawlessly.
Ingredients for Walking Cherry Cheesecakes
Here’s what you’ll need to make this delicious dish:
- Cream Cheese: Use full-fat cream cheese for that rich, velvety texture that makes every bite feel indulgent.
- Sour Cream: This adds a tangy kick that balances the sweetness perfectly; go for full-fat for extra creaminess.
- Granulated Sugar: Sweeten your mixture with sugar; adjust based on how sweet you want your cheesecake.
- Vanilla Extract: Choose pure vanilla extract for the best flavor; it brings warmth and depth to the cheesecake.
- Cherry Pie Filling: Grab a can or make your own; either way, it adds that delicious cherry goodness we crave.
- Graham Cracker Crust: You can buy pre-made or crush graham crackers yourself for a homemade touch; either option works great.
How to Make Walking Cherry Cheesecakes
Follow these simple steps to prepare this delicious dish:
Step 1: Prepare Your Crust
Start by preheating your oven to 325°F (160°C). If you’re making your crust from scratch, crush about one and a half cups of graham crackers until fine. Mix them with melted butter until the mixture resembles wet sand. Press it firmly into mini cheesecake pans or muffin tins lined with paper cups.
Step 2: Make the Cheesecake Filling
In a large mixing bowl, beat together softened cream cheese and sour cream until smooth and creamy. Add granulated sugar and vanilla extract. Beat until everything is well combined and fluffy—aim for about two minutes; no one likes lumpy cheesecake!
Step 3: Assemble Your Cheesecakes
Spoon the cheesecake filling into each prepared crust until they’re almost full—leave some room for that luscious cherry topping! Smooth out the tops with a spatula because presentation matters even in desserts.
Step 4: Bake to Perfection
Place your mini cheesecakes in the oven and let them bake for about 20-25 minutes or until set but still slightly jiggly in the middle—like you after a long day at work! Allow them to cool completely before adding toppings.
Step 5: Top with Cherry Filling
Once cooled, generously spoon cherry pie filling over each cheesecake like it’s icing on a cake. Don’t hold back here; go wild!
Step 6: Chill and Serve
Refrigerate for at least two hours before serving so everything sets beautifully together. When it’s time to serve, grab forks and enjoy this delightful treat while basking in your culinary glory!
Transfer to plates if desired—just remember that these beauties are best enjoyed chilled straight from their mini homes!
You Must Know
- Walking Cherry Cheesecakes are not just a dessert; they’re a delightful experience!
- Easy to prepare and perfect for gatherings, they bring smiles to faces with every bite.
- The combination of creamy cheesecake and vibrant cherries makes them irresistible, ensuring you’ll want to whip them up again and again.
Perfecting the Cooking Process
Start by preparing the cheesecake filling first, then bake your crust while it cools. Finally, top with luscious cherry sauce before serving. This sequence ensures everything aligns perfectly for those delectable Walking Cherry Cheesecakes.
Add Your Touch
Feel free to swap out cherries for strawberries or blueberries if you prefer. A splash of almond extract can add a delightful twist, or consider adding crushed graham crackers for extra crunch in the cheesecake mix!
Storing & Reheating
Store any leftover Walking Cherry Cheesecakes in an airtight container in the fridge for up to three days. To enjoy later, simply let them sit at room temperature for about 30 minutes before serving for that fresh taste.
Chef's Helpful Tips
- Use full-fat cream cheese for a richer flavor that elevates your cheesecakes.
- Make sure your ingredients are at room temperature to ensure a smooth mix without lumps.
- And lastly, don’t overbake the crust; it should be golden but not hard!
Sometimes, I make these Walking Cherry Cheesecakes for family gatherings, and they always ask for seconds! It’s a joy to see everyone’s faces light up when they take their first bite.
FAQs :
What are Walking Cherry Cheesecakes?
Walking Cherry Cheesecakes are a portable dessert that combines the creamy goodness of cheesecake with the sweet and tart flavor of cherries. They are served in convenient cups or jars, making them easy to enjoy on the go. The dessert typically features a graham cracker crust, a luscious cheesecake filling, and a generous topping of cherry pie filling. Macaron Cake for Celebrations These delightful treats are perfect for picnics, parties, or any occasion where you want to impress without the hassle of traditional cheesecakes.
How do I store Walking Cherry Cheesecakes?
To keep your Walking Cherry Cheesecakes fresh, store them in an airtight container in the refrigerator. They can last up to four days when properly stored. If you want to make them ahead of time, prepare the cheesecake filling and crust separately and assemble them just before serving. This will ensure optimal freshness and taste. Avoid freezing these desserts as it may alter the texture of the cheesecake filling.
Can I customize my Walking Cherry Cheesecakes?
Absolutely! One of the best features of Walking Cherry Cheesecakes is their versatility. You can swap out cherry pie filling for other fruits such as strawberries, blueberries, or even mixed berries. For added flavor, consider infusing your cheesecake filling with vanilla extract or almond extract. Chocolate Dipped Strawberries You can also create different crusts using chocolate cookies or nut-based crusts for a unique twist.
Are Walking Cherry Cheesecakes easy to make?
Yes, making Walking Cherry Cheesecakes is quite simple! The recipe requires basic ingredients and minimal preparation time. With just a few steps—creating the crust, mixing the filling, and assembling your dessert—you will have delicious individual servings ready to serve. Strawberry Choux Au Craquelin Even novice bakers can successfully create these delightful treats without any fuss.
Conclusion for Walking Cherry Cheesecakes :
Walking Cherry Cheesecakes offer a fun and delicious way to enjoy this classic dessert in a portable format. With their creamy texture and sweet cherry topping, they’re sure to please any crowd. Storing them correctly ensures they stay fresh for several days, while customization options allow you to get creative with flavors and toppings. Whether for gatherings or personal indulgence, these cheesecakes are an excellent choice that brings joy in every bite.
Walking Cherry Cheesecakes
Walking Cherry Cheesecakes are the ultimate portable dessert, merging creamy cheesecake with a luscious cherry topping all nestled in a buttery graham cracker crust. Perfect for summer gatherings or cozy nights at home, these individual treats are simple to prepare and sure to impress. With each bite, experience the delightful balance of sweet and tart flavors that will leave your taste buds craving more.
- Prep Time: 15 minutes
- Cook Time: 25 minutes
- Total Time: 40 minutes
- Yield: Serves 12 mini cheesecakes 1x
- Category: Dessert
- Method: Baking
- Cuisine: American
Ingredients
- 8 oz cream cheese, softened
- 1/2 cup sour cream
- 1/2 cup granulated sugar
- 1 tsp pure vanilla extract
- 1 cup cherry pie filling
- 1 1/2 cups graham cracker crumbs
- 1/4 cup unsalted butter, melted
Instructions
- Preheat oven to 325°F (160°C).
- In a bowl, mix graham cracker crumbs with melted butter until crumbly. Press into mini cheesecake pans or muffin tins lined with paper cups.
- In another bowl, beat cream cheese and sour cream until smooth. Add sugar and vanilla; mix until fluffy.
- Fill each crust with the cheesecake mixture, leaving space for topping.
- Bake for 20-25 minutes until slightly jiggly in the center. Cool completely.
- Top with cherry pie filling before serving.
Nutrition
- Serving Size: 1 mini cheesecake (60g)
- Calories: 210
- Sugar: 14g
- Sodium: 150mg
- Fat: 12g
- Saturated Fat: 7g
- Unsaturated Fat: 4g
- Trans Fat: 0g
- Carbohydrates: 22g
- Fiber: 0g
- Protein: 3g
- Cholesterol: 30mg