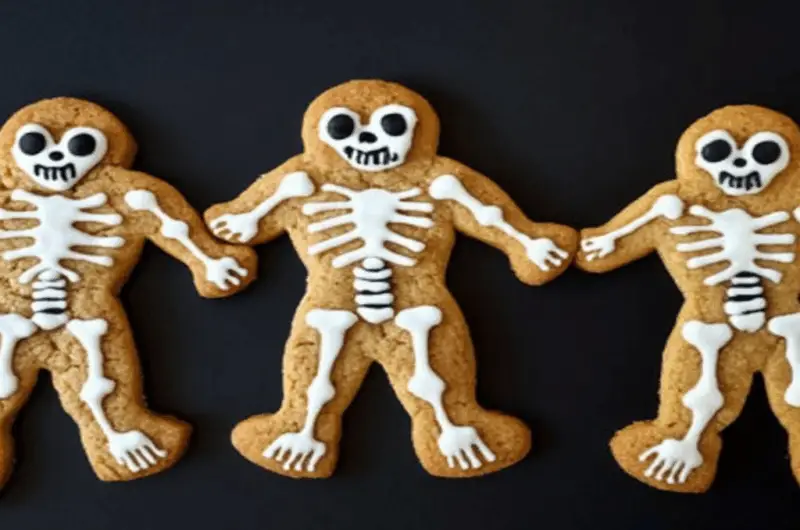
Skeleton Cookies are not just any cookies; they are delightful, spooky treats that bring a bit of Halloween magic to your kitchen. Imagine biting into a crispy, buttery cookie adorned with creepy icing—each little skeleton smiling back at you as if to say, “Eat me, if you dare!” These cookies are perfect for parties, school events, or an afternoon snack that will thrill the kids and amuse the adults.
I still remember the first time I made Skeleton Cookies. It was Halloween, and my kitchen was filled with laughter and flour explosions. We decorated them together, and by the end of the day, we had more icing on our faces than on the cookies! These treats have become a family tradition, making every spooky season even sweeter. So roll up your sleeves and get ready for a flavor experience that will make you howl with delight!
Why You'll Love This Recipe
- Skeleton Cookies are easy to prepare and perfect for bakers of all skill levels.
- Their rich vanilla flavor combined with creamy icing is sure to delight everyone.
- The playful skeleton design adds a spooky yet fun touch to any occasion.
- These cookies can be customized for other holidays or themes too!
Ingredients for Skeleton Cookies
Here’s what you’ll need to make this delicious dish:
- All-Purpose Flour: The backbone of your cookies; use fresh flour for the best texture.
- Granulated Sugar: Sweetens up the dough beautifully; feel free to adjust based on your sweet tooth.
- Unsalted Butter: Make sure it’s softened; this ingredient adds richness and helps create a tender cookie.
- Eggs: Provides structure and moisture; room temperature eggs work best for even blending.
- Vanilla Extract: Use pure vanilla extract for an aromatic flavor that elevates these cookies.
- Baking Powder: Helps your cookies rise; don’t skip this or your skeletons might be flat!
For the Icing:
- Powdered Sugar: This sweet dust is key for making smooth icing; sift it for a lump-free finish.
- Milk: Adds just enough liquid to achieve the right consistency; use whole milk for extra creaminess.
- Food Coloring: Get creative! Black and white food coloring will help you create those spooky skeleton features.
How to Make Skeleton Cookies
Follow these simple steps to prepare this delicious dish:
Step 1: Preheat Your Oven
Preheat oven to 350°F (175°C). Line baking sheets with parchment paper to prevent sticking.
Step 2: Make Your Dough
In a large bowl, cream together softened butter and sugar until light and fluffy. Add eggs one at a time followed by vanilla extract, mixing well after each addition.
Step 3: Combine Dry Ingredients
In another bowl, whisk together flour, baking powder, and salt. Gradually add this mixture into the wet ingredients until just combined.
Step 4: Shape Your Cookies
Roll out the dough on a floured surface to about half an inch thick. Use skeleton-shaped cookie cutters to cut out shapes. Place them on prepared baking sheets.
Step 5: Bake
Bake in preheated oven for about 10-12 minutes until edges are lightly golden but centers are still soft. Let cool completely on racks.
Step 6: Decorate
Mix powdered sugar with milk until smooth for icing. Divide into bowls and tint with food coloring as desired. Use piping bags or ziplock bags with corner snipped off to decorate your skeletons!
Transfer each decorated cookie onto a serving platter—this ghostly treat is ready to impress!
So there you have it! A delightful way to embrace the Halloween spirit while enjoying scrumptious Skeleton Cookies that promise not just fun but also flavor in every bite!
You Must Know
- Skeleton cookies are not just a spooky treat; they bring festive cheer to any Halloween gathering.
- Their crisp edges and soft centers create the perfect combination, making them a hit with kids and adults alike.
- These cookies can be easily customized for your Halloween party theme.
Perfecting the Cooking Process
To get those skeleton cookies just right, start by mixing your dry ingredients first. Once well-combined, cream the butter and sugar together until fluffy. Then, gradually add the flour mix while keeping an eye on dough consistency for perfect results.
Add Your Touch
Feel free to swap out some of the regular flour for almond or oat flour for a unique twist. You can also add spooky sprinkles or colored icing to make these skeleton cookies pop at your Halloween party!
Storing & Reheating
Store your skeleton cookies in an airtight container at room temperature for up to one week. If you want to savor them longer, freeze them in a single layer and then transfer to a freezer bag.
Chef's Helpful Tips
- Use room temperature ingredients for easier mixing and better texture.
- Make sure to chill the dough before rolling out; this keeps the shapes intact while baking.
- Don’t skip the icing; it’s where all the fun begins!
It was my nephew’s first Halloween, and I decided to make skeleton cookies for his little monster friends. Their delighted faces as they decorated their own cookies made my heart swell with joy—definitely a moment I’ll cherish forever!
FAQs :
What are Skeleton Cookies?
Skeleton cookies are delightful Halloween-themed treats that are shaped like skeletons. These cookies are typically made from a simple sugar cookie dough, which is then rolled out and cut into fun skeleton shapes. Decorated with icing or fondant, these cookies not only look spooky but also taste delicious. beach themed cupcakes graduation themed cookies They serve as perfect party favors or festive snacks for Halloween gatherings. Their playful design and sweet flavor make them a favorite among both kids and adults.
How can I decorate Skeleton Cookies?
Decorating skeleton cookies allows for creativity and fun! You can use royal icing to pipe intricate designs on each cookie, such as bones and facial features. Alternatively, you could use melted chocolate or candy melts for easier application. Adding edible glitter or sprinkles can give your skeleton cookies an extra festive touch. Feel free to let your imagination run wild with colors and designs to make your cookies stand out at any Halloween event.
Can I make Skeleton Cookies in advance?
Yes, you can definitely make skeleton cookies in advance! Prepare the cookie dough and cut out the shapes, then freeze them until you’re ready to bake. Once baked, you can store the plain cookies in an airtight container for up to a week before decorating them. If you’ve already decorated them, they can last several days at room temperature when stored properly. This makes it convenient for planning ahead of any Halloween festivities!
What flavors work best for Skeleton Cookies?
While traditional skeleton cookies are often made using classic vanilla-flavored sugar cookie dough, you can experiment with various flavors to suit your taste. Chocolate, almond, or even pumpkin spice cookie dough can add a unique twist to your treats. Incorporating these flavors will not only enhance the taste but also provide a delightful variation that guests will love during Halloween celebrations.
Conclusion for Skeleton Cookies :
Skeleton cookies offer a fun and festive way to celebrate Halloween while indulging in delicious treats. With their unique shapes and creative decorations, these cookies are sure to impress guests of all ages. Preparing them in advance allows for stress-free party planning, while experimenting with flavors adds a personal touch. Whether served at a gathering or gifted as party favors, skeleton cookies will be a spooky yet sweet highlight of your celebration!
Skeleton Cookies
Skeleton Cookies are the perfect festive treat for Halloween! These delightful vanilla-flavored cookies, shaped like playful skeletons and decorated with colorful icing, make for a fun baking experience that both kids and adults will enjoy. Whether you’re hosting a spooky gathering or looking for a sweet activity with loved ones, these cookies are sure to enchant everyone. Gather your family for a memorable baking session and indulge in these tasty treats!
- Prep Time: 20 minutes
- Cook Time: 12 minutes
- Total Time: 32 minutes
- Yield: Approximately 24 cookies 1x
- Category: Dessert
- Method: Baking
- Cuisine: American
Ingredients
- 2 ¾ cups all-purpose flour
- 1 cup granulated sugar
- 1 cup unsalted butter (softened)
- 2 large eggs (room temperature)
- 2 tsp vanilla extract
- 1 tsp baking powder
- 3 cups powdered sugar (for icing)
- 5 tbsp whole milk
- Food coloring (black and white)
Instructions
- Preheat the oven to 350°F (175°C) and line baking sheets with parchment paper.
- In a large bowl, cream together softened butter and granulated sugar until light and fluffy. Add eggs one at a time, mixing well after each addition, then stir in vanilla extract.
- In another bowl, whisk together flour, baking powder, and salt. Gradually add this mixture to the wet ingredients until just combined.
- Roll out the dough on a floured surface to about ½ inch thick. Use skeleton-shaped cookie cutters to cut out cookies and place them on prepared baking sheets.
- Bake for 10-12 minutes until edges are lightly golden but centers remain soft. Let cool completely on wire racks.
- For icing, mix powdered sugar with milk until smooth; divide into bowls and tint with food coloring as desired. Decorate cookies using piping bags or ziplock bags.
Nutrition
- Serving Size: 1 serving
- Calories: 120
- Sugar: 8g
- Sodium: 50mg
- Fat: 6g
- Saturated Fat: 4g
- Unsaturated Fat: 2g
- Trans Fat: 0g
- Carbohydrates: 15g
- Fiber: <1g
- Protein: 1g
- Cholesterol: 20mg